
This is the third of a multipart series on podcasting for print and online newspaper
staffs.
In the simplest of terms, the mixer combines the various audio inputs into one signal that is sent to our workstation for editing on our software.
For the majority of our podcasts, that means combining two or more microphone inputs into one signal, which is eventually edited and turned into an audio production. For other audio programming, such as interviews outside of class, the input is one or more audio files from an audio recorder or smart phone.
Since we’re recording conversation, we don’t need the sophisticated touch of a professional sound person, just some quick adjustments which will balance the input, or audio level, of each microphone.
Here’s a quick explanation of how we keep things simple with our Alesis 8-channel mixer, our Shure PG-48 microphones and Adobe Audition CC on our workstation, developed with the help of one of the school’s music instructors who also works with audio on a professional level.
So, for example, let’s ready a microphone for use on Channel 1:
- The “Gain” control knob is set at
the 3 o’clock position. Gain deals with input level coming into a channel, and
since the Shure PG-48s are low-output mics our music instructor felt it best to
start with the gain at a strong position. - Using the channel’s “Level” knob
(which can be a slider on some mixers), and keeping an eye on the audio level
indicator on Audition, have the person speak into the mic at the same volume he
or she will use for recording while adjusting the level. Level reflects volume being
recorded.
NOTE: Maximum audio level should reflect the level indicator reaching yellow, but not red. Red reflects an audio level that is set too high (too “hot”), and that is when “clipping” occurs. Clipping distorts the audio being recorded.
- Follow the same steps on Channels
2, 3, and 4, as needed. - The “Main Mix” knob, which
controls the levels on all channels, is be set at the 12 o’clock position. (This
can be a slider on some mixers.)
Sometimes, students have very soft or loud voices, and we’ll adjust the gain or even Main Mix knobs to equalize microphone outputs (that is, speakers’ volumes).
We keep things simple as possible as the majority of journalism students/newspaper staff members do not produce more than three or four audio recordings during their 3- to 4-years in the journalism program. Requiring sophisticated usage of the mixer would entail a steep learning curve which is outside of my journalism program’s goals.
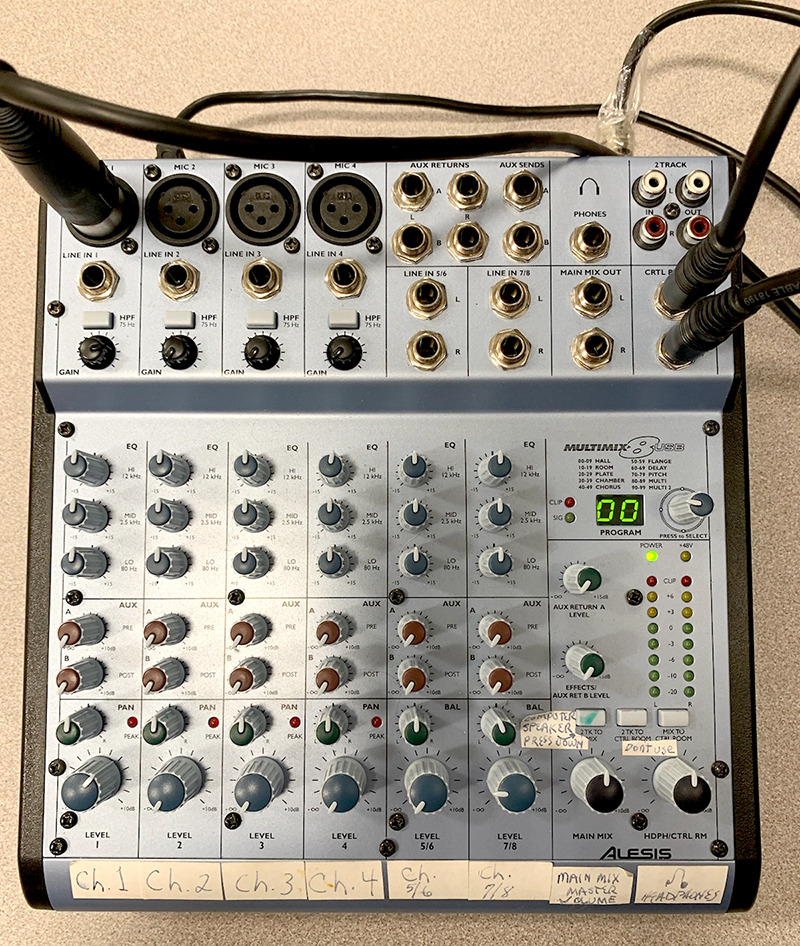
Referring to the photo above, here’s a quick overview of the controls and our settings on Channels 1-4, from top to bottom.
- Plug-in
from Mic’s XLT connection to mixer’s XLT connection - 1/4-inch
TRS input. - High Pass Filter. Push in to use.
We generally use it to minimize air conditioning noise and whatever vehicle
traffic/classroom noise gets into the room we use as our studio. Unfortunately,
the room is not sound proof. - Gain
knob: We set it at 3 o’clock. See above for further details. - EQ
(equalizer) controls: We leave them at 12 o’clock. - Auxiliary
pre and post: We leave them off. - Pan
control: Adjusts audio to left or right channels. We leave it at 12 o’clock. - Peak
indicator light (next to pan knob): Flashes when output level is about to be
clipped. See above for further details. - Level
knob: Controls mic output (volume) on that channel. It is eventually mixed with
other outputs to form one output which is then fed into our audio editing
program.
Other items to note on our mixer setup:
- Microphone
is plugged into Channel 1 in this example. - Two
thin wires on top of mixer: left is USB cable connecting the mixer board to the
work station; right wire is power cord. - Two
TRS inputs, plugged into Control Room jacks, connect the mixer to the headphone
amplifier. This allows all participants to hear each other through headphones.
(See previous installment for more details on the headphone amp. - Two
rows of LED lights at far right of mixer: These indicate output levels, which
correspond to the levels indicator on Audition. Note the progression of green
lights at bottom that change to yellow, then to red, which shows clipping, or
distortion, of audio output. You will also see the power on/off and 48-volt
phantom power indicators. We do not use the latter as we don’t use condenser
microphones. Switches are on the back of the mixer.
Next up: Recording podcasts on a smart phone, then simple editing for all audio files.
Written By: Mark Webber